FileMaker Server Backup to Remote Folders on Windows OS
So, your client is running FileMaker Server, and they want their backup files to be stored in a shared or remote folder on the network so an automated routine can pick them up from another computer. And your client is not flexible about this; the files must be in the network folder by 3:00am or very bad things will happen! <insert doom mood music here> You then dutifully go to the FileMaker Server (FMS) console and type in the new backup path only to find out, no matter what you do, it is not a valid path. You are unable to have FileMaker Server backup to a remote folder, now what do you do?
FMS can only back up to LOCAL folders/drives. So, FMS is correct – it is not a valid path. FMS will not let you back up to a remote folder for some very good reasons, which they dutifully detail in their Best Practices. To be fair, while this might seem as if it were anything from an annoyance to an oversight, to a flat out bug, they have strong points and they prohibit it for good reasons. But, good reasons or not, your client needs those files in that shared remote folder…
How do you make FileMaker Server backup to remote folders? The answer is simple enough, you let the OS handle it in any number of ways. What follows is a solution for Windows that I set up a few years ago for a client. It was, to my thinking, the simplest of all solutions: run a system-level batch file. The batch file in question, named copy.bat, uses xcopy to achieve its magic. The xcopy command is a Windows shell command that copies files and folders from one location to another. FMS’ ability to run system-level scripts allows you to use this batch file to copy your backups to any location on the network visible from the FMS service.

Here’s how I put it together:
- FMS runs a complete verified backup to the specified location. We will call that location<<LocalBackupFolder>>, and we’ll also need a scheduled task in the FileMaker Server Admin Console called ‘FMS_Backup’.
- Next, we need FMS to perform a system-level script that runs the copy.bat file at a reasonable time after the backup task completes. We will call this task ‘OS_MoveLocalBackup_Script’. The ‘OS_MoveLocalBackup_Script’ task will copy any files changed on or after the date specified by the calculations in copy.bat from <<LocalBackupFolder>> to another folder specified within copy.bat. We will call this location <<RemoteFolder>>.
- After these two tasks complete, you will have a copy of your backup folder at the remote location your client requires.
- Now, there are some considerations to take into account here:
- The timing of the FMS tasks: You have to leave enough time between the tasks to allow the backup to finish before the xcopy begins. You should run a test of the FMS_Backup task and add a reasonable amount of time for occasional delays and future increases in file sizes. So, if FMS_Backup takes an hour to run I would start ‘OS_MoveLocalBackup_Script’ 1.5 hours after you start FMS_Backup.
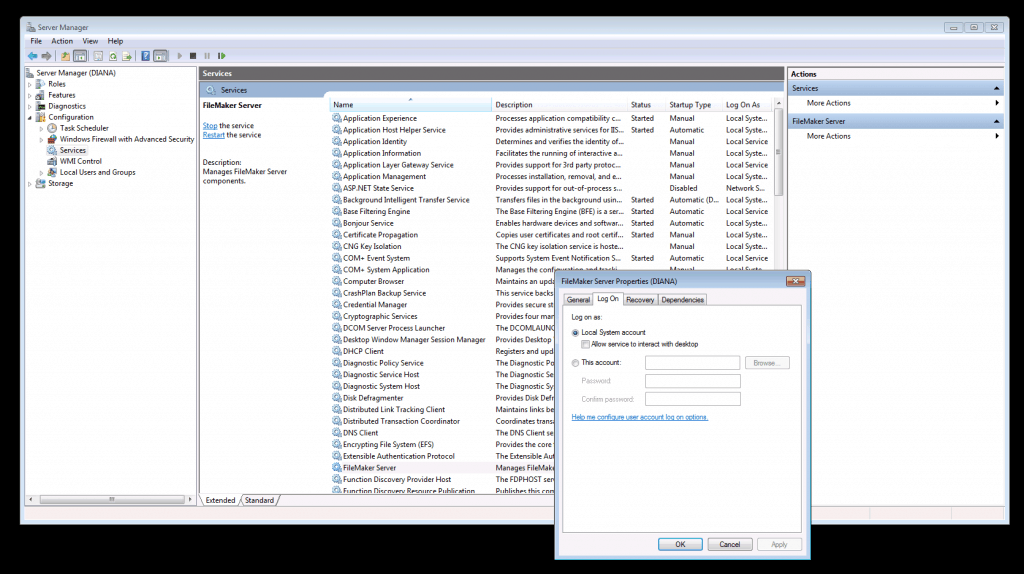
- You need to be mindful of what permissions FMS is running under, this can be very important under certain Microsoft environments. FMS is really a service and runs with its own permissions independent from the desktop environment. This means that, even if you can access the remote share by browsing to it, FMS might not have access. If the ‘OS_MoveLocalBackup_Script’ fails, you can set FMS to run under a different account by changing the settings at: Computer>Services>FileMaker Server>Properties>Log On>This Account
- Or for the less Windows-savvy:
- Right click on Computer and select Manage.
- On the Services screen, right-click on FileMaker Server and select Properties.
- On the Log On tab, select the ‘This Account’ radio button.
- Enter the required credentials and click the Apply button.
- Close the Computer Management window.
- Restart FMS.
- The xcopy command described here assumes FMS_Backup and ‘OS_MoveLocalBackup_Script’ run on the same day.
- As with any new routine on your server, testing is important. Please test and experiment on something you could afford to lose to make sure it works for you and within your environment/situation.
The copy.bat file will just be a plain text file containing the following command: xcopy /y /s /e /d:%date:~4,2%-%date:~7,2%-%date:~10,4% <<LocalBackupFolder>> <<RemoteFolder>>
When creating your copy.bat file, substitute <<LocalBackupFolder>> and <<RemoteFolder>> with your actual file paths, each enclosed in quotes. You should also be sure the Windows setting to hide file extensions for known file types is disabled, so you don’t unintentionally name your file copy.bat.txt.
With actual folder paths, this might look something like: xcopy /y /s /e /d:%date:~4,2%-%date:~7,2%-%date:~10,4% “C:\Program Files\FileMaker\FileMaker Server\Data\Backups” \\Server\Data\MyBackups
WAIT! There’s More!
In part two of this series I will show you how to, using the same paradigm, copy yesterday’s remote server backup. This allows for the common condition of copying an 11pm FMS_Backup using an ‘OS_MoveLocalBackup_Script’ fired at 4am the next morning when the network is good and quiet.
In the meantime, enjoy!
While I can attest that this script works, as it is being used right now, I strongly ask that you use this with caution. Please test and experiment with it on something that you could afford to lose to make sure it works for you and within your environment/situation. This script/technique is being shared with you “AS-IS” and we do not offer any free support, so use this technique at your own risk. But if you would like to retain our FileMaker support services, please contact one of the Excelisys account managers, Rick or Mark, and we would love to work with you!


Leave A Comment